

Map a network drive or shared folder on your local network to a letter
Every PC has a "C:\" drive: for historical reasons, it's the letter assigned to the built-in drive from which Windows runs. When you plug-in external drives, they too get assigned a letter. That's convenient, because you can explore their content just by typing that letter , a colon (:), a backslash (\), and then hitting Enter. You can do that from the address bar in Explorer, from the search field in the taskbar / start menu, and from the Run dialog. You even get auto-completion: 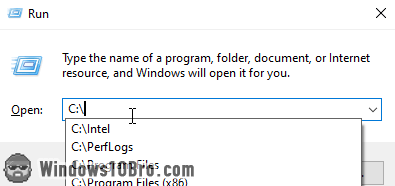
Windows lets you access drives that are not on your PC the exact same way, which is amazingly useful. This lets you share content from a central location, and it's called "mapping a network drive". Plus, it's really easy to do.
First, map your drive
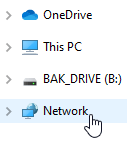 Open File Explorer (Windows Explorer) and click on the "Network" link on the left, in the navigation pane. The first time you do that, you'll probably see the "
Network discovery is turned off
" message pictured below. Just click OK to dismiss it.
By default, network discovery is turned off for security reasons: Windows doesn't need to allow PCs and devices (like printers) to communicate over the network unless there's a reason to do so. Joining a local network at work or at home is a good reason to turn it on: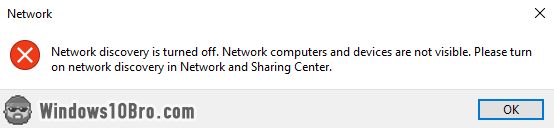
Enabling network discovery (if necessary)
Click on the yellow bar (which becomes blue when you hover above it), and click on it. Choose "Turn on network discovery and file sharing" from the menu that opened: you'll need to supply the administrator's password to proceed. 
Pick the first choice in the next popup: "No, make the network that I am connected to a private network". You don't want to enable that feature for public networks (like airports or coffee shops), where you'd potentially become pray to bad people who scan Wi-Fi in public places to find easy targets. 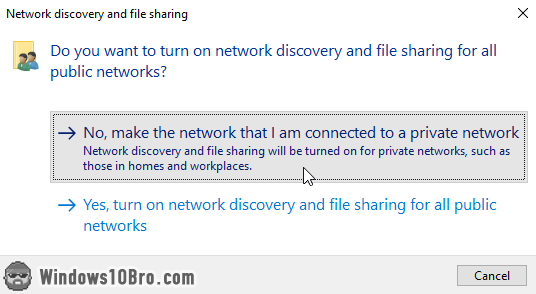
Once you enabled network discovery, give Windows some time to scan your local network. It will show you all the resources shared over the network.
Select a drive to map
Double-click on the computer (PC/server) or network-attached storage to which you want to connect. In my case, I'll connect to a laptop I use as file server (to store things). It contains two shared folders that I'll each map as a drive: 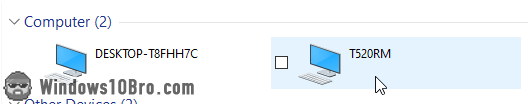
Windows will now show you all the resources that are shared from that computer - in my case, a few shared folders. Right-click on the one you want to map as a drive, and choose "Map network drive" from the context menu. 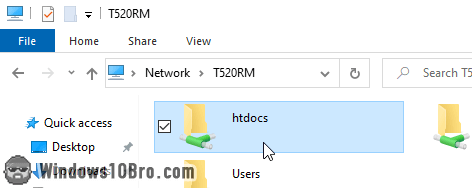
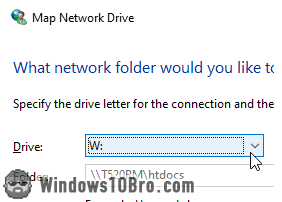 In the Map network drive popup, select a letter to which you want to map that drive or shared folder. (Windows only shows you available letters.) I pick the letter "W", short for "Web Projects". If you regularly connect to the same network drives and shared folders, create a convention to always use the same letter for the same target: "B" for the backup drive, "S" for shared documents, etc. These are just examples.
Automatically reconnect to the mapped drive
With the "Reconnect at sign-in" checkbox checked, Windows will automatically try to reconnect to that network drive the next time it boots or connects to the network. If the machine that hosts that shared drive is always on, keeping this option checked makes sense. When you wake Windows from sleep, it sometimes needs a few seconds before reconnecting to network drives - that's normal.
Optionally connect using a different username / password
The "Connect using different credentials" option is unchecked by default: don't check it unless you know that you need to provide a specific username and password to connect to that machine. Click Finish when you are done.
Windows will try to connect to that network drive / shared folder, and open it in File Explorer (Windows Explorer) upon success. If you click on the "This PC" link on the left of the Explorer window, you'll now see your network resource listed, as shown on the screenshot, under the Network locations heading: 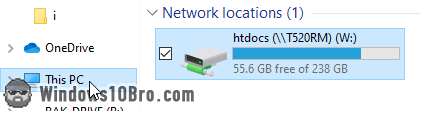
Remove a network drive
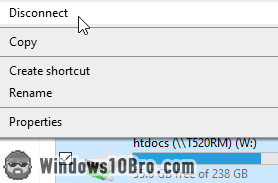 If you need to use the drive letter you assigned to another drive or shared folder, or if you just no longer want to connect to that network drive, no problem. Just right-click on it in Explorer, and choose "Disconnect" from the menu. Windows will remove it from under the Network locations heading. You can still access its content by browsing the network, but you won't be able to access it by its handy letter any more.